• Welcome to Jetboaters.net!

    We are delighted you have found your way to the best Jet Boaters Forum on the internet! Please consider Signing Up so that you can enjoy all the features and offers on the forum. We have members with boats from all the major manufacturers including Yamaha, Seadoo, Scarab and Chaparral. We don't email you SPAM, and the site is totally non-commercial. So what's to lose? IT IS FREE!

    Membership allows you to ask questions (no matter how mundane), meet up with other jet boaters, see full images (not just thumbnails), browse the member map and qualifies you for members only discounts offered by vendors who run specials for our members only! (It also gets rid of this banner!)

    free hit counter

Help - one engine won’t pass 6500 rpm

FLJetBoater

Jet Boat Junkie
Messages
741
Reaction score
283
Points
137
Boat Make
Yamaha
Year
2020
Boat Model
242 Limited S E-Series
Boat Length
24
2015 242 LS

one engine is running rough and won’t pass 6500 rpm. Other engine runs up to 8500 or so.

changed plugs twice
Compression
1-170
2-135
3-135
4-145

Changed plugs but still the same. picture of old plugs below cylinder 1-4 top to bottom.
Any ideas what to check? Thinking of pulling/swapping pumps to see if it swaps sides but seems more like an engine thing than a pump thing?
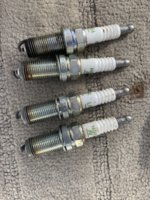
FEDA48FD-07E8-49FC-B650-CF80C233F82B.jpeg
 
Video of rough engine

Rough engine

 
Did you try pulling the coil plugs off one at a time to see if the cylinders were actually firing?
No I can try that. Just pull them off right as it’s running?
 
Sounds like it is missing out. First plugs could be bad throw in a new set and get the gaps right, Second look down in each plug cap its attached to the coil pack their is a spring and contact (they can burn out spring/contact ) causing a spark jump that causes a poor spark. Third if new plugs and all the contacts look good and she still runs rough I would test the coil packs. Anything after that get a little more serious like pulling the injectors and doing a compression test. Hope this helps a little.
 
Sounds like it is missing out. First plugs could be bad throw in a new set and get the gaps right, Second look down in each plug cap its attached to the coil pack their is a spring and contact (they can burn out spring/contact ) causing a spark jump that causes a poor spark. Third if new plugs and all the contacts look good and she still runs rough I would test the coil packs. Anything after that get a little more serious like pulling the injectors and doing a compression test. Hope this helps a little.

I’ve already done 2 spark plug changes and no change in performance.

So I swapped all the coils with the other engine and the issue is still there - so probably safe to eliminate those.

I unplugged the coils 1 by 1 and when 2 and 3 are disconnected the engine will start but stalls out quickly. When 1 is disconnected it basically sounds the same, when 4 is disconnected it sounds a bit rougher but runs and doesn’t stall.

compression test results are in the opening post.

If I disconnect a single coil on the good engine it sounds similar to the bad one.

next step I am going to get a spark tester and hook it to the coil to see if they are providing power or none at all. Anyone have recommendations? The one I bought first doesn’t reach up the boot far enough to connect
 
I don’t know what the correct compression readings are, but #1 is very different than the others, that plug looks worse, and your coil test shows that’s where the problem lies. Double check whether or not spark there? Injector next?
 
I don’t know what the correct compression readings are, but #1 is very different than the others, that plug looks worse, and your coil test shows that’s where the problem lies. Double check whether or not spark there? Injector next?
Just got a different inline tester…..no spark on #1. #2 was fine - Changed 1/2 coils and still no spark on 1.

is this a wiring issue now? Ecu?

nothing looks visibly wrong at the harness connection to the coil
 
The coils packs have 3 wires. For cylinder 1 Red/yellow is +12vdc, black is ground, black/red is the trigger wire from the ECM that tells the coils when to pulse producing a quick AC pulse. This is generally controlled by the Cam shaft position sensor (CPS). A bad CPS could be the culprit, shorted wiring or connections could be, bad ecm could be it too.

First I would check the check wiring and connections. Then test with a DMM. After that try swapping CPS. I would then check the timing chain and sprockets as this is what the CPS reads. If all fail to produce desired results on top of what you have already tried then perhaps a bad ecm.
 
Swapped CPS - no change
 
Check the ECM voltage, to coil packs, you need to crank her without start so Service manual states remove all 4 fuel injectors couplers. Remove all coil couplers use voltage tester lead negative to center wire(black) Positive test lead to B/R, B/W, B/Y, B/G looks like each coil coupler different color. Voltage while cranking 2.5v at each coil coupler.

Center wire black to Red/Yellow in coil couplers(crank) gives you Battery to coil voltage..........nice consistence reading between all 4 on batt side(12v) and EMC side (2.5v) should give you a better picture.
 
Last edited:
Update:
Tested wiring with DMM from the grey connector. The 12vdc wire was fine. Ground was fine. But, the other wire was showing no voltage at all while cranking.
Swapped ECU same result.
so, thinking it’s a wire issue…..

pulled the connectors out of the ECU and found the matching wires and tested for continuity. 12vdc fine, but the other wire was showing no continuity.

spliced into the wire near the coil connector and measured again from there to the coil connector- no continuity.

pulled the connector apart and the metal wire connector out of it and it came right out of the wire sheath. The wire was clean cut inside the sheathing. I don’t even have a clue how that would happen across all the strands.

stripped the main wire from the ECU and re-crimped it to the metal connector, reassembled the connector and sounds good as new….

the crimp we did is only temporary. Anyone know where I can get one of those metal connectos are they standard or are they unique to Yamaha?
 

Attachments

  • 8926A498-76B5-4D04-9307-4B4A594299A4.jpeg
    8926A498-76B5-4D04-9307-4B4A594299A4.jpeg
    2.1 MB · Views: 32
Update:
Tested wiring with DMM from the grey connector. The 12vdc wire was fine. Ground was fine. But, the other wire was showing no voltage at all while cranking.
Swapped ECU same result.
so, thinking it’s a wire issue…..

pulled the connectors out of the ECU and found the matching wires and tested for continuity. 12vdc fine, but the other wire was showing no continuity.

spliced into the wire near the coil connector and measured again from there to the coil connector- no continuity.

pulled the connector apart and the metal wire connector out of it and it came right out of the wire sheath. The wire was clean cut inside the sheathing. I don’t even have a clue how that would happen across all the strands.

stripped the main wire from the ECU and re-crimped it to the metal connector, reassembled the connector and sounds good as new….

the crimp we did is only temporary. Anyone know where I can get one of those metal connectos are they standard or are they unique to Yamaha?

Looks like a tiny female spade. Perhaps 2.8mm or smaller. Can be purchased lots of items laces including amazon. Measure the original first with some calipers to get the right size.

As to the how. Quite possibly that wire was a bit shorter and taking most of the load of everything going to that connector. Perhaps a bad strip when making the harness at the factory too. If shorter than the others make a good splice further down to lengthen it. Ratchet crimpers can be your friend here as they make much better crimps. Solder, crimp, and double walled glued heat shrink makes a very good connection.

Glad you figured it out and not the ECM. Hopefully you have that proud as a peacock feeling.
Thanks. I will measure it tomorrow.
I was also thinking that when I do the spark plugs I don’t actually disconnect the coils. I just pull them up and bend them back out of the way and that could contribute to it as well. Will definitely be disconnecting them from now on.

super happy it’s not the ECM or major engine issue! Hopefully can source the connector tomorrow, put it all back together and get a water test in.
 
Wow, great diagnostic information and great catch FLJetBoater. I have been searching around because my starboard engine runs up to 7,250 rpm but Port is only 6,850 rpm and looking for things to check. I don't have any missing like you did but still this is good stuff. Glad you found the problem, bet you are really happy about that!
 
Wow, great diagnostic information and great catch FLJetBoater. I have been searching around because my starboard engine runs up to 7,250 rpm but Port is only 6,850 rpm and looking for things to check. I don't have any missing like you did but still this is good stuff. Glad you found the problem, bet you are really happy about that!
Thanks! I have one last thing to do on this still and that’s fine the connector. They aren’t just standard 2.8mm connectors. They have square heads and a cut out section where it clips into the grey plastic connector and seem to be very difficult to find but I can’t imagine that Yamaha dealers are buying entire new wire harnesses when one of these fails.


A7B3E1F6-842E-42AC-9045-FA6DBB0BAA84.jpeg
54A4D443-CD1C-4AD5-A5A6-AA8447EB6900.jpeg
 
Have you tried an electrical supply house like Graybar or maybe a large auto parts store?

Or are you able to solder the cable to what’s left of the connector? Not saying that’s the way to go, but might be a short term fix.
 
Have you tried an electrical supply house like Graybar or maybe a large auto parts store?

Or are you able to solder the cable to what’s left of the connector? Not saying that’s the way to go, but might be a short term fix.
That’s actually what I was thinking (solder) to keep a good connection while I look around …
 
Back
Top