drewkaree
Jetboaters Fleet Admiral 1*
- Messages
- 7,089
- Reaction score
- 26,006
- Points
- 812
- Location
- West Allis & Fremont, WI
- Boat Make
- Yamaha
- Year
- 2019
- Boat Model
- AR
- Boat Length
- 21
I'm not eligible for the SeaDek discount due to the non-standard color, so I figured if I bought a small sheet of it, I could test out how easy it would be to do my own on a few small areas. I bought the sheet from Amazon, cost at this time is $50 for a piece that was 18" x 38". I can also get two other sizes, 18" x 74" for $80, and 40" x 80" for $150. Pricing seems to be fixed across the board, no matter who you choose, so go with whoever ends up being the least expensive for you after shipping and tax and whatnot. For doing the cockpit area of my boat, I believe I can complete this with $500 in material. That may change slightly, since I haven't measured everything yet, but it's my belief that I shouldn't exceed $600 for what I want to do.
The wife character agreed with me that the OEM carpet of the 2019 AR210 was hotter than hell (your model and/or carpet may be just fine, but the stuff supplied with MY boat was most definitely NOT). We removed the carpet after the first week of having the boat tied up to the pier, and in full sun, and it hasn't gone back in since. I was considering going with the group buy from Will last year, but as the year wore on, I was noticing how easily the gray on the swim platform would get all crapped up, and in reading a few threads here, others noticed the same thing and went with different colors. I ordered a fistful of samples from SeaDek, and when they arrived, I let the wife look at them and decide what she would like. She liked 5 different colors, and when I reminded her of cleaning the swim platform, she quickly narrowed it down to 3, all of them blue. We "tested" all of them out, and the aqua camo is what we were satisfied with, so that ruled us out of any group buy.
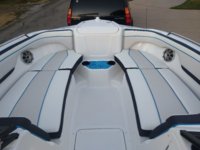
I finally got around this year to cutting up the sheet that I had purchased, after I was trying to jump in the boat from the trailer, and busting my ass up sliding all over. I have a cutlist program that will spit out the best way to divvy up sheet goods based on the input of the measurements you give - I use this a lot for plywood. Dunno if they have an iOS version for Apple, but if you've got an Android, the program is called CutList Optimizer. It's also available on the web, but I found it easier to take my phone into the boat and enter my measurements in as I took them. I originally wanted to do the foot rest at the helm area, but I figured I could do 3 smaller pieces that would give me a better feel for whether I'd be able to do this or not. I chose to do the step-over spot between the stern seats, the area of the removable seat in the stern (I have never put this seat cushion back in since we first removed it), and the step in the bow right between the two cup holders. This would give me one "easy" piece (seat cushion piece), one "medium" difficulty piece (the step-over), and one "difficult" piece (the bow step). I figured the bow piece would definitively indicate whether this would be something I could tackle, or let me know whether I would want to give up at that point, and just pay Will for his expertise. For whatever reason, I went with the medium difficulty piece first, and today I finished the difficult bow piece, and I'm confident enough to post this, and I've decided to go ahead and tackle this job myself. This post isn't the whole boat, it's simply the process I used to do the difficult bow piece, and I thought it might be helpful to some of you to see how I did this. If you're not a patient person, I promise you that your money will be well spent by having Will do the work for you, cutting out all these pieces. This also clearly won't be the type of project with the teak look, since the aqua camo doesn't seem to be made like that.
On with the show. First, I remove the cup holders. Screw the trim ring counterclockwise, and pull that off, then 3 screws to remove, and you've got yourself a hole! I tried doing this a few weeks ago without removing the cupholders, and it was less than stellar results. In doing this, I also learned that they didn't seal underneath these cup holders at all, and there's some bare wood showing, as well as the fiberglass edges, so I think I'll be caulking these down in the very near future, or perhaps some 4200 to cover everything and seal the cup holders down to the deck.
(My hotspot is crapping out on me right now, so I've gotta add pics as I'm able to, hopefully I won't lose all the text when I try to post this)
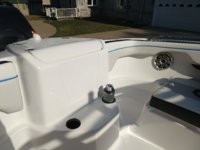
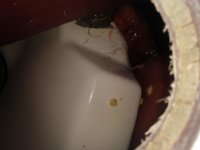
Templating for this is pretty easy, since the traction pattern molded into the deck transmits easily through some paper. The wife had some thanksgiving stuff left over, but regular old printer paper or a legal pad will do just fine. You don't need card stock, you simply need something to get a general shape. Tape a few pieces together to cover the area you need to create a template for, tape it all down so it's nice and smooth and lays properly on the deck, then take a pencil and rub over the paper. The traction pattern nubs will be highlighted, giving you a perfect shape that you're wanting to cover with SeaDek. I used masking tape to hold the pieces together, and it didn't work as nicely in the taped areas, but it will suffice for what I need it to do. I MAY try to get a roll of butcher paper so I won't have to tape things together for the larger pieces, but with this little experiment here, it's not a must-have item. As you can see, with the cup holders removed, I can easily trace over that area and get a better template, than if I had left them in place, and tried to trace around the cup holders.
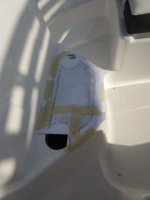
Take your rough template and put it on something nice to work on - I used a piece of XPS insulation. I also use this to cut the pieces. It gives the SeaDek some backing/support, as well as allowing me to run the cutter right into it, ending in a nice clean cut. To get the baseline of the template, you simply connect the "dots" of the traction pattern. This will give you the basic shape. When you're done with that, you will need to decide how much of a border to add to your template to give you the coverage you desire. In this case, the line outlining the dots is how large my final piece will be, and I also used the trim ring from the cup holder to outline a nice circle in that area. This doesn't have to be perfect, but it will help if you try your best to maintain a steady hand when drawing/outlining that line. In my case, I used a scribing tool (accuscribe from FastCap), and I simply used the pointed end to follow the outline of the traction pattern, and I spaced the pencil to the amount that I wanted, which gave me a nice evenly spaced line. My scribing tool is shown in another picture further down. Whatever you use, you want an even and consistent distance from your tracing.
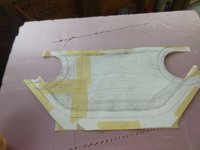
When you've got your shape reasonably close, flip your rough template over and thoroughly tape the area where your cuts are going to be. This will give you a nice edge after everything is cut, because you're going to need to trace your template onto the SeaDek, and NOT doing this may result in your pen/pencil wandering all over - it's just gonna be a lot easier if you tape this, trust me on this one. Here, you can see the fancy paper my wife gave me. This doesn't have to be perfect, you just want your tape to cover the area where all the cut lines are going to be.
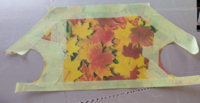
Cut out your template. If you have some etch-a-sketch looking lines, here's your chance to fix them. Here, you can see how the template is looking like it's nearing completion. I have noticed with some other stuff (decals, window clings, etc), that sharp points are death in the long run for your material, so I'm gonna round off those sharp points you see in this pic. You may also notice that it looks like there's some crap edges there, and you'll see in the end result that either they get cleaned up along the way in this process, or it's an optical illusion. I'm going to say that when all is said and done, it got cleaned up in the process.
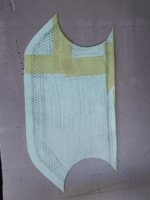
Prior to rounding off those sharp points, I did a test fit to see how everything was looking at this time, and to get an idea of how much I wanted to round the points off. It's a nice fit so far
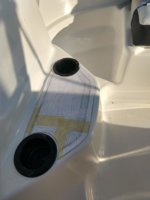
Here, you can see how I rounded those points off. I used a piece of 3/4" PEX to give it a nice shape, put it right up to the lines, and added the rounded corners to eliminate a potential trouble spot of my new installation. After this, take the scissors and cut the rounded edge of your paper template
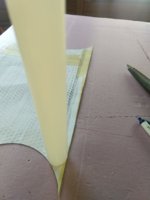
Here's the final outcome of my template, and here's the scribing tool I used. It's simply a fancy compass, "improved" for cabinet installations and woodworking trim. I forgot to take a pic of transferring the template dimensions to the back of the SeaDek, but what I did after finishing the template shown in this pic was to take some of the wife's pins and run them through the template and SeaDek, and into the XPS, so my hands would be free to hold the template while I traced around the template edges. I used a super-fine Sharpie - not the kind with the big felt end. Use whatever works for you, but the sharpie was the only thing I could find that would work on the backing paper. If you only have the felt-tipped-pen type of Sharpie, I'd suggest holding the edge of the template flat, and going over the edge of the template onto the backing paper, to transfer the template dimensions onto the backing paper.
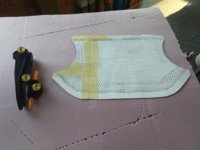
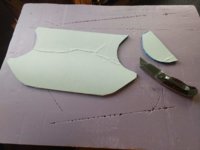
Now, you're gonna want some sort of razor blade or other super sharp cutting implement, such as an Xacto knife or scalpel or...you get the idea, BUT - BUT - DO NOT USE YOUR SCISSORS TO CUT THE SEADEK! It doesn't have to be anything super fancy, but a scissors will squeeze the SeaDek, and you will end up with serial killer edges. In the pic below, this is what I used for all of my cuts. That's simply one of those replaceable razor blade knives. MAKE SURE you use a BRAND NEW blade. Replace these often, they dull quickly, and you won't realize it until your cuts start looking like crap. In this pic, I've cut the majority of everything. I was able to use that knife to do the cut for the cup holder, but for the smaller rounded corners, I simply cut as close as I could to remove as much excess material prior to the next step. As an aside, I removed the pins to allow removal of the template, then I put the pins back through the same holes to hold the SeaDek in place while I cut it on the XPS sheet.
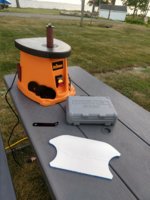
Now, you may wish to use this as anexcuse opportunity to purchase a few tools. Treat yourself, go get yourself the male version of a purse. At the very least, you will need a Dremel and sanding attachments. I used the Dremel to finish off the first piece I did, and it will work just fine. I am in the process of making a few rocking chairs, and I was going to need something better suited to this than my random orbit sander, so I bought myself a Triton oscillating spindle sander. I used it to finish rounding off those sharp points, and it worked great for this purpose. Use some of your offcuts to see which direction will be best - IIRC, against the rotation of the tool gave me the best results, but test it first. You'll get a feel for how quickly you can remove material, how deep you can go in one pass, and what the proper direction is for you to sand whatever needs to be sanded.
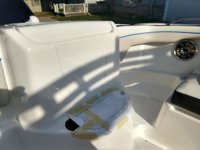
Now that your SeaDek piece is to your satisfaction (test the fit of your piece until you're happy with it - it shouldn't require much, if any, tinkering with the fit), install it. Go on SeaDek's website and watch their installation video, and follow it. Here's the end result of what I considered to be one of the most difficult pieces I would be doing, and I feel supremely confident that I am capable of completing the rest of the interior of my boat.
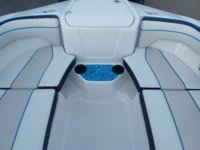
Tomorrow, I will hopefully be able to finish the last "test piece" I was going to attempt. I also plan to complete the measurements I need to figure out the best size and quantity of sheet material to complete the job, and I'll be placing an order soon. One tip I forgot to mention is that when using the CutList Optimizer program, in your materials list, add several sheets of each size (meaning tell the program you have 15 sheets of each size of the material). The program will give you the "best solution" for what you plan to cut up, and you will have a diagram of what to cut out of each sheet, and what sheets you should be buying. I'll try to remember to take a screenshot of the program after entering in a few pieces so my explanation is a little clearer.
*edit* final piece done today
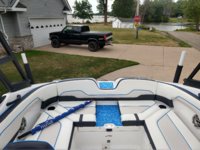
The wife character agreed with me that the OEM carpet of the 2019 AR210 was hotter than hell (your model and/or carpet may be just fine, but the stuff supplied with MY boat was most definitely NOT). We removed the carpet after the first week of having the boat tied up to the pier, and in full sun, and it hasn't gone back in since. I was considering going with the group buy from Will last year, but as the year wore on, I was noticing how easily the gray on the swim platform would get all crapped up, and in reading a few threads here, others noticed the same thing and went with different colors. I ordered a fistful of samples from SeaDek, and when they arrived, I let the wife look at them and decide what she would like. She liked 5 different colors, and when I reminded her of cleaning the swim platform, she quickly narrowed it down to 3, all of them blue. We "tested" all of them out, and the aqua camo is what we were satisfied with, so that ruled us out of any group buy.
I finally got around this year to cutting up the sheet that I had purchased, after I was trying to jump in the boat from the trailer, and busting my ass up sliding all over. I have a cutlist program that will spit out the best way to divvy up sheet goods based on the input of the measurements you give - I use this a lot for plywood. Dunno if they have an iOS version for Apple, but if you've got an Android, the program is called CutList Optimizer. It's also available on the web, but I found it easier to take my phone into the boat and enter my measurements in as I took them. I originally wanted to do the foot rest at the helm area, but I figured I could do 3 smaller pieces that would give me a better feel for whether I'd be able to do this or not. I chose to do the step-over spot between the stern seats, the area of the removable seat in the stern (I have never put this seat cushion back in since we first removed it), and the step in the bow right between the two cup holders. This would give me one "easy" piece (seat cushion piece), one "medium" difficulty piece (the step-over), and one "difficult" piece (the bow step). I figured the bow piece would definitively indicate whether this would be something I could tackle, or let me know whether I would want to give up at that point, and just pay Will for his expertise. For whatever reason, I went with the medium difficulty piece first, and today I finished the difficult bow piece, and I'm confident enough to post this, and I've decided to go ahead and tackle this job myself. This post isn't the whole boat, it's simply the process I used to do the difficult bow piece, and I thought it might be helpful to some of you to see how I did this. If you're not a patient person, I promise you that your money will be well spent by having Will do the work for you, cutting out all these pieces. This also clearly won't be the type of project with the teak look, since the aqua camo doesn't seem to be made like that.
On with the show. First, I remove the cup holders. Screw the trim ring counterclockwise, and pull that off, then 3 screws to remove, and you've got yourself a hole! I tried doing this a few weeks ago without removing the cupholders, and it was less than stellar results. In doing this, I also learned that they didn't seal underneath these cup holders at all, and there's some bare wood showing, as well as the fiberglass edges, so I think I'll be caulking these down in the very near future, or perhaps some 4200 to cover everything and seal the cup holders down to the deck.
(My hotspot is crapping out on me right now, so I've gotta add pics as I'm able to, hopefully I won't lose all the text when I try to post this)


Templating for this is pretty easy, since the traction pattern molded into the deck transmits easily through some paper. The wife had some thanksgiving stuff left over, but regular old printer paper or a legal pad will do just fine. You don't need card stock, you simply need something to get a general shape. Tape a few pieces together to cover the area you need to create a template for, tape it all down so it's nice and smooth and lays properly on the deck, then take a pencil and rub over the paper. The traction pattern nubs will be highlighted, giving you a perfect shape that you're wanting to cover with SeaDek. I used masking tape to hold the pieces together, and it didn't work as nicely in the taped areas, but it will suffice for what I need it to do. I MAY try to get a roll of butcher paper so I won't have to tape things together for the larger pieces, but with this little experiment here, it's not a must-have item. As you can see, with the cup holders removed, I can easily trace over that area and get a better template, than if I had left them in place, and tried to trace around the cup holders.


Take your rough template and put it on something nice to work on - I used a piece of XPS insulation. I also use this to cut the pieces. It gives the SeaDek some backing/support, as well as allowing me to run the cutter right into it, ending in a nice clean cut. To get the baseline of the template, you simply connect the "dots" of the traction pattern. This will give you the basic shape. When you're done with that, you will need to decide how much of a border to add to your template to give you the coverage you desire. In this case, the line outlining the dots is how large my final piece will be, and I also used the trim ring from the cup holder to outline a nice circle in that area. This doesn't have to be perfect, but it will help if you try your best to maintain a steady hand when drawing/outlining that line. In my case, I used a scribing tool (accuscribe from FastCap), and I simply used the pointed end to follow the outline of the traction pattern, and I spaced the pencil to the amount that I wanted, which gave me a nice evenly spaced line. My scribing tool is shown in another picture further down. Whatever you use, you want an even and consistent distance from your tracing.

When you've got your shape reasonably close, flip your rough template over and thoroughly tape the area where your cuts are going to be. This will give you a nice edge after everything is cut, because you're going to need to trace your template onto the SeaDek, and NOT doing this may result in your pen/pencil wandering all over - it's just gonna be a lot easier if you tape this, trust me on this one. Here, you can see the fancy paper my wife gave me. This doesn't have to be perfect, you just want your tape to cover the area where all the cut lines are going to be.

Cut out your template. If you have some etch-a-sketch looking lines, here's your chance to fix them. Here, you can see how the template is looking like it's nearing completion. I have noticed with some other stuff (decals, window clings, etc), that sharp points are death in the long run for your material, so I'm gonna round off those sharp points you see in this pic. You may also notice that it looks like there's some crap edges there, and you'll see in the end result that either they get cleaned up along the way in this process, or it's an optical illusion. I'm going to say that when all is said and done, it got cleaned up in the process.

Prior to rounding off those sharp points, I did a test fit to see how everything was looking at this time, and to get an idea of how much I wanted to round the points off. It's a nice fit so far

Here, you can see how I rounded those points off. I used a piece of 3/4" PEX to give it a nice shape, put it right up to the lines, and added the rounded corners to eliminate a potential trouble spot of my new installation. After this, take the scissors and cut the rounded edge of your paper template

Here's the final outcome of my template, and here's the scribing tool I used. It's simply a fancy compass, "improved" for cabinet installations and woodworking trim. I forgot to take a pic of transferring the template dimensions to the back of the SeaDek, but what I did after finishing the template shown in this pic was to take some of the wife's pins and run them through the template and SeaDek, and into the XPS, so my hands would be free to hold the template while I traced around the template edges. I used a super-fine Sharpie - not the kind with the big felt end. Use whatever works for you, but the sharpie was the only thing I could find that would work on the backing paper. If you only have the felt-tipped-pen type of Sharpie, I'd suggest holding the edge of the template flat, and going over the edge of the template onto the backing paper, to transfer the template dimensions onto the backing paper.

Now, you're gonna want some sort of razor blade or other super sharp cutting implement, such as an Xacto knife or scalpel or...you get the idea, BUT - BUT - DO NOT USE YOUR SCISSORS TO CUT THE SEADEK! It doesn't have to be anything super fancy, but a scissors will squeeze the SeaDek, and you will end up with serial killer edges. In the pic below, this is what I used for all of my cuts. That's simply one of those replaceable razor blade knives. MAKE SURE you use a BRAND NEW blade. Replace these often, they dull quickly, and you won't realize it until your cuts start looking like crap. In this pic, I've cut the majority of everything. I was able to use that knife to do the cut for the cup holder, but for the smaller rounded corners, I simply cut as close as I could to remove as much excess material prior to the next step. As an aside, I removed the pins to allow removal of the template, then I put the pins back through the same holes to hold the SeaDek in place while I cut it on the XPS sheet.

Now, you may wish to use this as an

Now that your SeaDek piece is to your satisfaction (test the fit of your piece until you're happy with it - it shouldn't require much, if any, tinkering with the fit), install it. Go on SeaDek's website and watch their installation video, and follow it. Here's the end result of what I considered to be one of the most difficult pieces I would be doing, and I feel supremely confident that I am capable of completing the rest of the interior of my boat.


Tomorrow, I will hopefully be able to finish the last "test piece" I was going to attempt. I also plan to complete the measurements I need to figure out the best size and quantity of sheet material to complete the job, and I'll be placing an order soon. One tip I forgot to mention is that when using the CutList Optimizer program, in your materials list, add several sheets of each size (meaning tell the program you have 15 sheets of each size of the material). The program will give you the "best solution" for what you plan to cut up, and you will have a diagram of what to cut out of each sheet, and what sheets you should be buying. I'll try to remember to take a screenshot of the program after entering in a few pieces so my explanation is a little clearer.
*edit* final piece done today

Last edited:


