
- Messages
- 13,385
- Reaction score
- 13,502
- Points
- 857
- Location
- Royal, AR
- Boat Make
- Yamaha
- Year
- 2007
- Boat Model
- SX
- Boat Length
- 23
Total cost <$50, total time ~15 minutes. Parts needed; bow light, 2 x male quick disconnects red, 2x #8 x 1 1/4" stainless screws.
I replaced the single bulb in my bow light with a LED last month. On the way to watch fourth of July fireworks the lake patrol pulled me over and said that my bow light looked red and blue instead of red and green. I believe that the LED bulb was too powerful and was overwhelming the green filter.
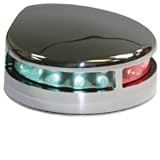
The plastic bow light was a little worn and I prefer to only have LED lights so I decided to replace it. After looking at available options I decided that I preferred the flat top of the $41 Seasense Led Combination Stainless Steel Bow Light, 12 Volt to the factory design. It seems like it would be much more pleasant if you stepped on it.
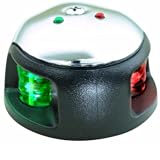
Another option that appears to be the same format as the factory bow light is the $26 Attwood LED 1-Mile Deck Mount Navigation Bow Side Light.
The Seasense unit is a 2 mile rated light. It contains 10 red and 10 green LEDs so a single bulb failure would not be an issue. Unfortunately it is just a little bit too large for the mount point on my SX230 and the third screw mount point is over an area cut out at the factory. But I believe it that it looks ok mounted despite the size issue.
The Seasense light has pry points at the front and back on the bottom to remove the stainless cover. Inside you will find the screw to lock it together. It is installed with the stainless cover removed then the stainless cover is installed as the last step. I soldered quick connects to the new bow lights wires and plugged it into the factory harness. Crimping would be fine, but I really would not want the crimp to fail. I was able to reuse the two factory screws holes. I used a drill to enlarge them to 1/8" then screwed down the bow light. The bow light is designed to have a third screw holding it down. This screw is in an area where the factory hole sawed a large hole for the wiring to pass through. If I decide the third screw is needed I will install it with a toggle bolt.
Here is a better picture taken with daylight.

Here are some pictures of it installed. I will add outdoor pictures later. Someday I may grab a ladder and remove the disco lighting


This is the light cast on my garage door

I believe the fit is fine. I asked @Rana for her opinion before installing and she liked it.
I am very happy with output of the light. I would prefer to have our boat as visible as possible at night while sticking to the regulations on what kinds of lighting should be where.
I replaced the single bulb in my bow light with a LED last month. On the way to watch fourth of July fireworks the lake patrol pulled me over and said that my bow light looked red and blue instead of red and green. I believe that the LED bulb was too powerful and was overwhelming the green filter.
The plastic bow light was a little worn and I prefer to only have LED lights so I decided to replace it. After looking at available options I decided that I preferred the flat top of the $41 Seasense Led Combination Stainless Steel Bow Light, 12 Volt to the factory design. It seems like it would be much more pleasant if you stepped on it.
Another option that appears to be the same format as the factory bow light is the $26 Attwood LED 1-Mile Deck Mount Navigation Bow Side Light.
The Seasense unit is a 2 mile rated light. It contains 10 red and 10 green LEDs so a single bulb failure would not be an issue. Unfortunately it is just a little bit too large for the mount point on my SX230 and the third screw mount point is over an area cut out at the factory. But I believe it that it looks ok mounted despite the size issue.
The Seasense light has pry points at the front and back on the bottom to remove the stainless cover. Inside you will find the screw to lock it together. It is installed with the stainless cover removed then the stainless cover is installed as the last step. I soldered quick connects to the new bow lights wires and plugged it into the factory harness. Crimping would be fine, but I really would not want the crimp to fail. I was able to reuse the two factory screws holes. I used a drill to enlarge them to 1/8" then screwed down the bow light. The bow light is designed to have a third screw holding it down. This screw is in an area where the factory hole sawed a large hole for the wiring to pass through. If I decide the third screw is needed I will install it with a toggle bolt.
Here is a better picture taken with daylight.
Here are some pictures of it installed. I will add outdoor pictures later. Someday I may grab a ladder and remove the disco lighting
This is the light cast on my garage door
I believe the fit is fine. I asked @Rana for her opinion before installing and she liked it.
I am very happy with output of the light. I would prefer to have our boat as visible as possible at night while sticking to the regulations on what kinds of lighting should be where.
Last edited:


")


