FSH 210 Sport
Jetboaters Fleet Admiral
- Messages
- 7,275
- Reaction score
- 9,028
- Points
- 512
- Location
- Tranquility Base
- Boat Make
- Yamaha
- Year
- 2020
- Boat Model
- FSH Sport
- Boat Length
- 21
This one is a long time coming as I had wanted to do a more comprehensive thread after I got home from WI this summer and had to replace a wear sleeve while I was in WI. While the concept of the replaceable wear sleeve is a good one, it sure would be nice if Shorelnd’r would have included bearing maintenance and wear sleeve replacement in the owners manual. As well, the disc brake owners manual leaves a lot to be desired in terms of maintenance as well as parts.
When I was in WI this summer the drivers side front wheel started spitting some grease, I had worked on this wheel a few years back, replaced a grease seal and it still leaked, took it apart again and realized there was a replaceable wear sleeve. I replaced the wear sleeve and all was good up until this last summer when I had gone on my road trip to OK and then up to WI. I looked in my spares box and realized and I had set my extra wear sleeves aside in order to put them in last so they would not get crushed, they certainly won’t get crushed when they are sitting on the bench at home !
!
So while I was waiting for a couple of new wear sleeves to come from Hannah RV I found this youtube.
I did not realize that red loctite was necessary on the wear sleeves, I thought the inner bearing would hold it in place, it does not. The other thing that happens when this wear sleeve starts spinning on the spindle besides a grease leak is that water can get right into the inner bearing a past the grease seal.
Note: if you have a grease seal that is leaking, get a wear sleeve and install it with the new grease seal.
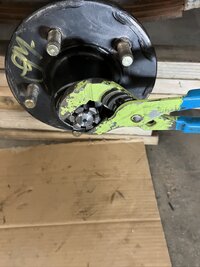
The passenger side front was starting to spit some grease towards the end of the summer so it needed to be serviced and I figured I’d service the two braking axle hubs while I was at it, as it turned out both braking hubs were starting to leak. This is what the passenger side front looked like, if you look closely you can see the wear sleeve spinning.
And this is what it looked like when I took the hub off. The wear sleeve came off with the hub.
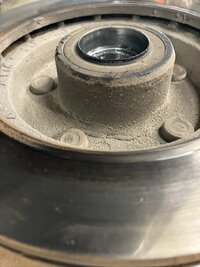
Here it is again with the sleeve partially pulled out.
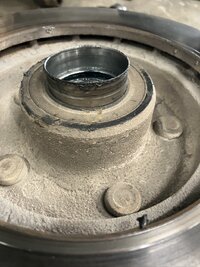
So I disassembled the hub and cleaned out the old grease which was not contaminated, then cleaned up the hub and prepared to install the new wear sleeve.
You can see here how little red loctite was put on from the factory..
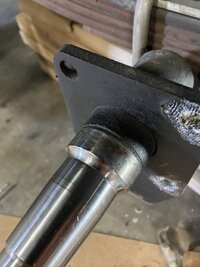
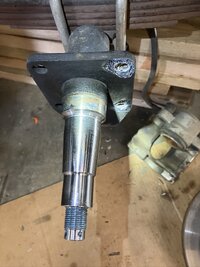
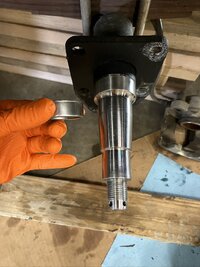
Here’s the spindle and wear ring ready for install
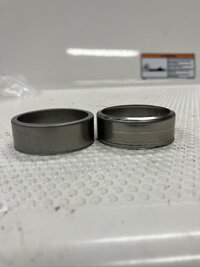
This next step was not covered in the youtube above with the guy talking about the red loctite. When you go to put the new wear sleeve on you have to seat it with the hub and bearings just like you seat freshly packed / re packed bearings. The picture below shows what the wear sleeve looks like new on the left and the old seated wear sleeve on the right.
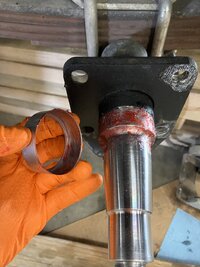
Here is the spindle and wear ring covered with red loctite paste, I like this much better than the liquid, it stays in place and doesn’t get all over the place.
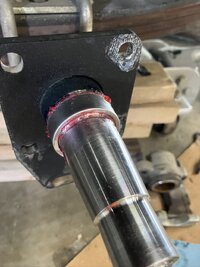
This wear sleeve is installed, I think its important to make sure you get red loctite spooging out everywhere not only for a good bond but to assure that no water can get down in behind the wear ring.
Wipe off all of this spooged red loctite and install the hub and bearings with NO grease seal and then seat the bearings like you normally would by turning the castle nut 90* after finger tight and rotating the hub back and forth, this seats the new wear sleeve in place on the spindle.
Then remove the hub and wipe up any additional spooged out red loctite, that’s a step left out in the first YouTube video, you don’t want any spooged out loctite gluing the inner bearing to the spindle. Sorry I didn’t take a picture of this.
Then reinstall the hub, tighten the castle nut finger tight then add about 45* with a wrench and leave over night for the loctite to dry, close to 24 hours is desirable. Leaving the hub on with the inner bearing pushed up against the new wear sleeve with no grease seal will ensure that it stays seated and locked into its future running position while the loctite dries.
Unless you do not have time, I’d suggest doing all the wheels at once. You’ll need some dunnage to prop up the axles, but just like light bulbs in a car, once one goes another one is not far behind.. Be sure and keep the bearings associated with the hub they came out of!
The next day you can then pull the hub off and re pack the bearings. My thinking on this is that if the grease in the bearings has not been contaminated you can just repack the bearings making sure that you push the old grease out with the new grease. If you feel the need to clean the bearings do so with diesel fuel and stiff brush, don’t use gasoline it’s way too flammable. Then rinse the bearings out with a non flammable contact cleaner like crc Lectra Motive, then blow the bearings out with compressed air and pack with grease.
Once you’ve got the bearings packed, then fill the hub with grease and install the grease seal I pack plenty of grease in the area asunder where the grease seal will go. This cuts down on how many times you will have to add grease to the bearing buddy as it pushes grease into all the nooks and crannies.
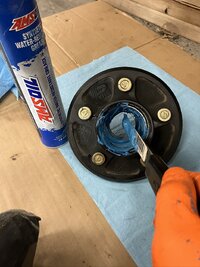
Now you can re assemble the hub, before you slide the hub in place put a very thin layer of grease onto the wear ring and thed sealing surfaces of the grease seal, this will allow the new grease seal to slide onto the wear sleeve easily and help ensure the lips of the grease seal don’t get messed up during installation.
Be sure and seat the bearings properly by turning the castle nut 90* past finger tight whilst rotating the hub back and forth, then back off to finger tight and drop a new cotter pin into the nearest hole and check the play, there should be a discernible little clunk when you move the hub back and forth, if there is no play pull the cotter pin out and go to the next cotter pin whole by turning the castle nut counter clockwise, drop the cotter pin into this hole and check the play, its better to have what may seem like too much play than to have the bearings set too tight, these are trailer bearings after all. Once you’ve got the play set bend the cotter pin across the end of the spindle and trim down the length if the cotter pin ends are sticking out too far. Again, sorry I don’t have a pic as my hands were covered with grease.
When you are all done, install a new bearing buddy. I have found through experience that bearing buddies are best treated as a single use item. They’re not that expensive, and unless you have a problem you won’t be needing another one for a few years. Yes if you’re very careful removing them, walk it out in small increments, you might get away with re using them but getting to the ramp and finding one is gone is a drag, I usually carry a spare just in case. Pump the bearing buddies with grease until the piston moves about 1/3 of its travel, after servicing the bearings the BB will push grease into hub until it’s full as you drive down the road, so take a grease gun with you on your first couple of outings, check the BB’s before you launch your boat, if you can push on the side of the piston and it wobbles it’s good to go as it’s sitting on grease, if the piston is seated and won’t wobble add enough grease so that wobbles. That’s also your grease level check when the BB’s are cold, this ensures there’s plenty of movement available on the spring loaded piston to accommodate the grease expansion when the hub gets hot without getting to the pressure relief point and making a greasy mess under the dust covers.

 www.bearingbuddy.com
The passenger side hubs on my trailer had not been removed since the trailer came from the factory, the grease was a dark blue and it was definitely time to service them, I have right around 35,000-40,000 miles on my trailer so those bearings had 35K to 40K on them. That’s about a typical grease service life on serviceable wheel bearings.
So the same holds true for your braking axles in terms of replacing and installing a new wear sleeve and servicing the bearings. I would suggest you check the run out on the disc rotor, I had a huge high spot on the driver side rear a couple years back, I took it to Oriely and had them turn the rotor.
To get the caliper off you will need a 7mm or 9/32” allen drive to remove the slide pins.. okay, who does that? 9/32”???? Really? Why not just a 1/4”..most allen sets don’t come with a 9/32”. You’ll need to remove the spring tensioner off of the caliper that holds the caliper tight to the the caliper hanger, NOTE ITS ORIENTATION.. no pic but its easy peasey. You have to pull the two plastic caps off of the rubber bushings to get to the slide pins.
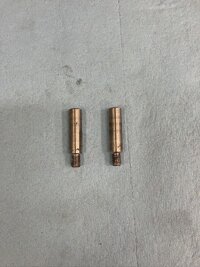
Here are the slide pins after removal. Clean them up well prior to reassembly.
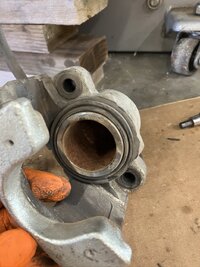
They go into those two black holes on either side of the piston, mine were dry on the drivers side, and the passenger side had just a little left.
Once you have the caliper off now the fun begins.. you will need a long 3/8” allen drive to get the caliper hanger off, and a short 3/8” allen to take out the hanger bolts one half turn at a time.. you cannot get at these bolts with a socket drive, maybe with a rounded tip allen you could but I didn’t have that. You have to take the caliper hanger off to get the hub off.
This is why bolts on boat trailers should be stainless steel and not cad coated, these are the bolts that attach the caliper hanger to the axle end.
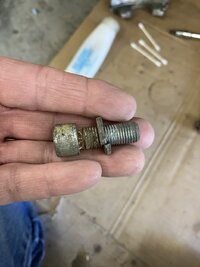
Clean up these bolts with a wire brush to prep them for assembly.
Also, clean up the area where the dogs / feet of the brake pads ride in the caliper hanger, these should be smooth with no perpendicular bumps that might inhibit the pads from sliding freely in these grooves, a light touch with a red scotch brite pad does the trick, and no lubricant in this area.
So as I mentioned earlier about the lacking of the owners manual for the disc brake caliper. Firstly there should be some sort of maintenance schedule and or directives in the owners manual but there is not. While I do not have any salt water experience, I’m sure that the precipitating event that causes calipers to hang up and cook the hub is not not servicing the slider pins. You can service these pins quickly and easily, and really should be done annually or at least bi annually if you don’t trailer too much, perhaps longer once you’ve established a service interval that works for you.
Second, there is a parts list in the disc brake owners manual but the slider pins and rubber bushings that slide on them are not listed, every other part is listed except the slider pins and rubber bushings. At least once a season you should take a pry bar and slide the assembled caliper so that it collapses the piston a little bit to make sure the caliper will move, do one side then pump the manual bleed lever in the actuator, if you compress both pistons at the same time you can push brake fluid out of the reservoir then there won’t be enough in the reservoir to re fill the pistons in the caliper and it will suck air and you’ll get to bleed the brakes.
So, take some Q tips and clean out the rubber bushings, I don’t think I’d use anything but water to clean out these bushings then blow them out with compressed air to dry them. Then using Q tips slather in plenty of silicone grease (there was silicone grease on the pins when I removed them) into the rubber bushings, there are some indentations inside these rubber bushings, like a bellows that act as a bit of a reservoir for this grease.
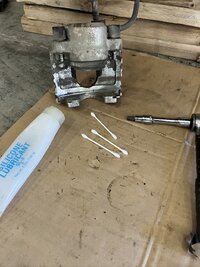
Put silicone grease on the pins and insert them allen head first taking care not to get silicone grease on the threads. Wipe up excess silicone grease with Q tips..
Next apply loctite 572 to the caliper hanger bolts. I like this stuff, its a low yield thread locker but primarily thread sealant to keep the water out. This is the same stuff that the service manual calls for on the jet pump bolts.
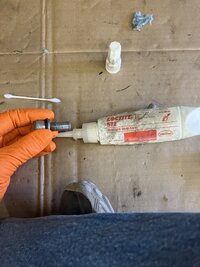
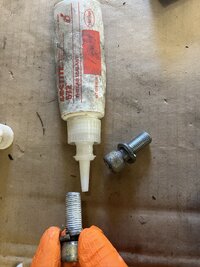
Wipe the threads off with a rag so you just have a thin coat of 572 on the threads and not so much that a big pile forms while you’re screwing the bolt in.
Install the hanger, this time the bolts should go most of the way in with your fingers and not a 1/2 turn at a time when you were removing them. Then use the long 3/8” allen to tighten them. I have no idea on a torque value and it wouldn’t matter since you can’t get a torque wrench on them anyway. CORRECTION; The torque is supposed to be 55ft lbs on these bolts, but there is no way to get at them with a torque wrench.
Now you’re ready to install the caliper, put some red loctite on the threads, there was red loctite residue on the threads when I took mine apart. This pic was taken after I put the loctite on and before I wiped off the excess.
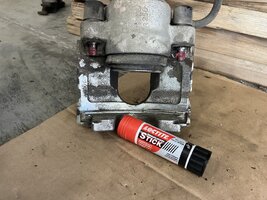
Tighten snugly…
Be sure and pump up the brakes with the manual bleeding device up in the actuator. Once you’ve got the brakes pumped back up give the hub a spin to make sure you have a skosh of drag on the rotor to know its ready for service. Now is a good time to check the brake fluid level too.
At this point you’re pretty much done except installing the wheels and on my trailer tightening the lugs to 90 ft lbs.
When I pulled the hubs off of the passenger side I found that there was a slight grease leak on both hubs, from the grease seal, and both wear sleeves were still in place albeit not very tight. The wear sleeves came off with just a little coercion from a pair of channel locks. If the wear sleeves are stuck on you will need a heat gun or a map gas torch, it can take up to 500° to get red loctite to let go, so a quick high heat on the wear sleeve will get it free with minimal heating on the spindle.
This is what the spindles looked like, yes, that is rust that was under the grease and under the red loctite and that is how it was assembled at the factory, boo.. it cleaned up well with some red scotch brite and some elbow grease. There wasnt much rod loctite to speak of.
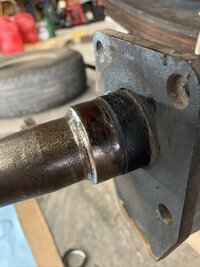
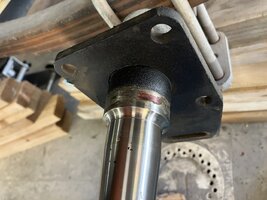
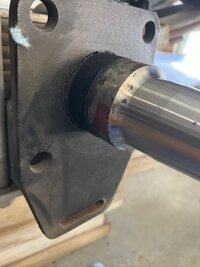
I had wanted to have more pictures but doing that would have had me taking off and putting on new gloves all the time.
Hope this helps with understanding how these hubs are put together, if you take the time to service the bearings chances are low you’ll be stuck on the side of the road or in a parking lot doing an emergency repair on a wheel bearing. Using a spot radiometer or heat gun on your hubs at each stop, and immediately after you stop will not only let you know if you have a problem but allows you to set a benchmark for each wheel. The non brake hubs will of course run cooler than the brake hubs, usually by about 10°. Towing on hotter days produces hotter hub temperatures, I think the highest temp I’ve seen was 148° on the braking hub. If you’ve been doing a lot of stop and go driving or driving in hilly country the braking hubs are going to read hotter.
When I was in WI this summer the drivers side front wheel started spitting some grease, I had worked on this wheel a few years back, replaced a grease seal and it still leaked, took it apart again and realized there was a replaceable wear sleeve. I replaced the wear sleeve and all was good up until this last summer when I had gone on my road trip to OK and then up to WI. I looked in my spares box and realized and I had set my extra wear sleeves aside in order to put them in last so they would not get crushed, they certainly won’t get crushed when they are sitting on the bench at home
So while I was waiting for a couple of new wear sleeves to come from Hannah RV I found this youtube.
I did not realize that red loctite was necessary on the wear sleeves, I thought the inner bearing would hold it in place, it does not. The other thing that happens when this wear sleeve starts spinning on the spindle besides a grease leak is that water can get right into the inner bearing a past the grease seal.
Note: if you have a grease seal that is leaking, get a wear sleeve and install it with the new grease seal.
The passenger side front was starting to spit some grease towards the end of the summer so it needed to be serviced and I figured I’d service the two braking axle hubs while I was at it, as it turned out both braking hubs were starting to leak. This is what the passenger side front looked like, if you look closely you can see the wear sleeve spinning.
And this is what it looked like when I took the hub off. The wear sleeve came off with the hub.

Here it is again with the sleeve partially pulled out.

So I disassembled the hub and cleaned out the old grease which was not contaminated, then cleaned up the hub and prepared to install the new wear sleeve.
You can see here how little red loctite was put on from the factory..


Here’s the spindle and wear ring ready for install

This next step was not covered in the youtube above with the guy talking about the red loctite. When you go to put the new wear sleeve on you have to seat it with the hub and bearings just like you seat freshly packed / re packed bearings. The picture below shows what the wear sleeve looks like new on the left and the old seated wear sleeve on the right.

Here is the spindle and wear ring covered with red loctite paste, I like this much better than the liquid, it stays in place and doesn’t get all over the place.

This wear sleeve is installed, I think its important to make sure you get red loctite spooging out everywhere not only for a good bond but to assure that no water can get down in behind the wear ring.

Wipe off all of this spooged red loctite and install the hub and bearings with NO grease seal and then seat the bearings like you normally would by turning the castle nut 90* after finger tight and rotating the hub back and forth, this seats the new wear sleeve in place on the spindle.

Then remove the hub and wipe up any additional spooged out red loctite, that’s a step left out in the first YouTube video, you don’t want any spooged out loctite gluing the inner bearing to the spindle. Sorry I didn’t take a picture of this.
Then reinstall the hub, tighten the castle nut finger tight then add about 45* with a wrench and leave over night for the loctite to dry, close to 24 hours is desirable. Leaving the hub on with the inner bearing pushed up against the new wear sleeve with no grease seal will ensure that it stays seated and locked into its future running position while the loctite dries.
Unless you do not have time, I’d suggest doing all the wheels at once. You’ll need some dunnage to prop up the axles, but just like light bulbs in a car, once one goes another one is not far behind.. Be sure and keep the bearings associated with the hub they came out of!
The next day you can then pull the hub off and re pack the bearings. My thinking on this is that if the grease in the bearings has not been contaminated you can just repack the bearings making sure that you push the old grease out with the new grease. If you feel the need to clean the bearings do so with diesel fuel and stiff brush, don’t use gasoline it’s way too flammable. Then rinse the bearings out with a non flammable contact cleaner like crc Lectra Motive, then blow the bearings out with compressed air and pack with grease.
Once you’ve got the bearings packed, then fill the hub with grease and install the grease seal I pack plenty of grease in the area asunder where the grease seal will go. This cuts down on how many times you will have to add grease to the bearing buddy as it pushes grease into all the nooks and crannies.

Now you can re assemble the hub, before you slide the hub in place put a very thin layer of grease onto the wear ring and thed sealing surfaces of the grease seal, this will allow the new grease seal to slide onto the wear sleeve easily and help ensure the lips of the grease seal don’t get messed up during installation.
Be sure and seat the bearings properly by turning the castle nut 90* past finger tight whilst rotating the hub back and forth, then back off to finger tight and drop a new cotter pin into the nearest hole and check the play, there should be a discernible little clunk when you move the hub back and forth, if there is no play pull the cotter pin out and go to the next cotter pin whole by turning the castle nut counter clockwise, drop the cotter pin into this hole and check the play, its better to have what may seem like too much play than to have the bearings set too tight, these are trailer bearings after all. Once you’ve got the play set bend the cotter pin across the end of the spindle and trim down the length if the cotter pin ends are sticking out too far. Again, sorry I don’t have a pic as my hands were covered with grease.
When you are all done, install a new bearing buddy. I have found through experience that bearing buddies are best treated as a single use item. They’re not that expensive, and unless you have a problem you won’t be needing another one for a few years. Yes if you’re very careful removing them, walk it out in small increments, you might get away with re using them but getting to the ramp and finding one is gone is a drag, I usually carry a spare just in case. Pump the bearing buddies with grease until the piston moves about 1/3 of its travel, after servicing the bearings the BB will push grease into hub until it’s full as you drive down the road, so take a grease gun with you on your first couple of outings, check the BB’s before you launch your boat, if you can push on the side of the piston and it wobbles it’s good to go as it’s sitting on grease, if the piston is seated and won’t wobble add enough grease so that wobbles. That’s also your grease level check when the BB’s are cold, this ensures there’s plenty of movement available on the spring loaded piston to accommodate the grease expansion when the hub gets hot without getting to the pressure relief point and making a greasy mess under the dust covers.

How Genuine BB® Works | BearingBuddy
 www.bearingbuddy.com
The passenger side hubs on my trailer had not been removed since the trailer came from the factory, the grease was a dark blue and it was definitely time to service them, I have right around 35,000-40,000 miles on my trailer so those bearings had 35K to 40K on them. That’s about a typical grease service life on serviceable wheel bearings.
So the same holds true for your braking axles in terms of replacing and installing a new wear sleeve and servicing the bearings. I would suggest you check the run out on the disc rotor, I had a huge high spot on the driver side rear a couple years back, I took it to Oriely and had them turn the rotor.
To get the caliper off you will need a 7mm or 9/32” allen drive to remove the slide pins.. okay, who does that? 9/32”???? Really? Why not just a 1/4”..most allen sets don’t come with a 9/32”. You’ll need to remove the spring tensioner off of the caliper that holds the caliper tight to the the caliper hanger, NOTE ITS ORIENTATION.. no pic but its easy peasey. You have to pull the two plastic caps off of the rubber bushings to get to the slide pins.
Here are the slide pins after removal. Clean them up well prior to reassembly.

They go into those two black holes on either side of the piston, mine were dry on the drivers side, and the passenger side had just a little left.

Once you have the caliper off now the fun begins.. you will need a long 3/8” allen drive to get the caliper hanger off, and a short 3/8” allen to take out the hanger bolts one half turn at a time.. you cannot get at these bolts with a socket drive, maybe with a rounded tip allen you could but I didn’t have that. You have to take the caliper hanger off to get the hub off.
This is why bolts on boat trailers should be stainless steel and not cad coated, these are the bolts that attach the caliper hanger to the axle end.

Clean up these bolts with a wire brush to prep them for assembly.
Also, clean up the area where the dogs / feet of the brake pads ride in the caliper hanger, these should be smooth with no perpendicular bumps that might inhibit the pads from sliding freely in these grooves, a light touch with a red scotch brite pad does the trick, and no lubricant in this area.
So as I mentioned earlier about the lacking of the owners manual for the disc brake caliper. Firstly there should be some sort of maintenance schedule and or directives in the owners manual but there is not. While I do not have any salt water experience, I’m sure that the precipitating event that causes calipers to hang up and cook the hub is not not servicing the slider pins. You can service these pins quickly and easily, and really should be done annually or at least bi annually if you don’t trailer too much, perhaps longer once you’ve established a service interval that works for you.
Second, there is a parts list in the disc brake owners manual but the slider pins and rubber bushings that slide on them are not listed, every other part is listed except the slider pins and rubber bushings. At least once a season you should take a pry bar and slide the assembled caliper so that it collapses the piston a little bit to make sure the caliper will move, do one side then pump the manual bleed lever in the actuator, if you compress both pistons at the same time you can push brake fluid out of the reservoir then there won’t be enough in the reservoir to re fill the pistons in the caliper and it will suck air and you’ll get to bleed the brakes.
So, take some Q tips and clean out the rubber bushings, I don’t think I’d use anything but water to clean out these bushings then blow them out with compressed air to dry them. Then using Q tips slather in plenty of silicone grease (there was silicone grease on the pins when I removed them) into the rubber bushings, there are some indentations inside these rubber bushings, like a bellows that act as a bit of a reservoir for this grease.

Put silicone grease on the pins and insert them allen head first taking care not to get silicone grease on the threads. Wipe up excess silicone grease with Q tips..
Next apply loctite 572 to the caliper hanger bolts. I like this stuff, its a low yield thread locker but primarily thread sealant to keep the water out. This is the same stuff that the service manual calls for on the jet pump bolts.


Wipe the threads off with a rag so you just have a thin coat of 572 on the threads and not so much that a big pile forms while you’re screwing the bolt in.
Install the hanger, this time the bolts should go most of the way in with your fingers and not a 1/2 turn at a time when you were removing them. Then use the long 3/8” allen to tighten them. I have no idea on a torque value and it wouldn’t matter since you can’t get a torque wrench on them anyway. CORRECTION; The torque is supposed to be 55ft lbs on these bolts, but there is no way to get at them with a torque wrench.
Now you’re ready to install the caliper, put some red loctite on the threads, there was red loctite residue on the threads when I took mine apart. This pic was taken after I put the loctite on and before I wiped off the excess.

Tighten snugly…
Be sure and pump up the brakes with the manual bleeding device up in the actuator. Once you’ve got the brakes pumped back up give the hub a spin to make sure you have a skosh of drag on the rotor to know its ready for service. Now is a good time to check the brake fluid level too.
At this point you’re pretty much done except installing the wheels and on my trailer tightening the lugs to 90 ft lbs.
When I pulled the hubs off of the passenger side I found that there was a slight grease leak on both hubs, from the grease seal, and both wear sleeves were still in place albeit not very tight. The wear sleeves came off with just a little coercion from a pair of channel locks. If the wear sleeves are stuck on you will need a heat gun or a map gas torch, it can take up to 500° to get red loctite to let go, so a quick high heat on the wear sleeve will get it free with minimal heating on the spindle.
This is what the spindles looked like, yes, that is rust that was under the grease and under the red loctite and that is how it was assembled at the factory, boo.. it cleaned up well with some red scotch brite and some elbow grease. There wasnt much rod loctite to speak of.


I had wanted to have more pictures but doing that would have had me taking off and putting on new gloves all the time.
Hope this helps with understanding how these hubs are put together, if you take the time to service the bearings chances are low you’ll be stuck on the side of the road or in a parking lot doing an emergency repair on a wheel bearing. Using a spot radiometer or heat gun on your hubs at each stop, and immediately after you stop will not only let you know if you have a problem but allows you to set a benchmark for each wheel. The non brake hubs will of course run cooler than the brake hubs, usually by about 10°. Towing on hotter days produces hotter hub temperatures, I think the highest temp I’ve seen was 148° on the braking hub. If you’ve been doing a lot of stop and go driving or driving in hilly country the braking hubs are going to read hotter.
Last edited:


