• Welcome to Jetboaters.net!

    We are delighted you have found your way to the best Jet Boaters Forum on the internet! Please consider Signing Up so that you can enjoy all the features and offers on the forum. We have members with boats from all the major manufacturers including Yamaha, Seadoo, Scarab and Chaparral. We don't email you SPAM, and the site is totally non-commercial. So what's to lose? IT IS FREE!

    Membership allows you to ask questions (no matter how mundane), meet up with other jet boaters, see full images (not just thumbnails), browse the member map and qualifies you for members only discounts offered by vendors who run specials for our members only! (It also gets rid of this banner!)

    free hit counter

SX190 New Captain's Chair Pedestal Replacement Options

14SX190

Jetboaters Lieutenant
Messages
739
Reaction score
650
Points
172
Location
South Florida
Boat Make
Yamaha
Year
2014
Boat Model
SX
Boat Length
19
After two outings my back is killing me trying to sit on bolster and losing back support.

Looking at making captain's chair taller and looking for a direct replacement that is adjustable.
Not sure if just the pedestal post can be taller or get something like this
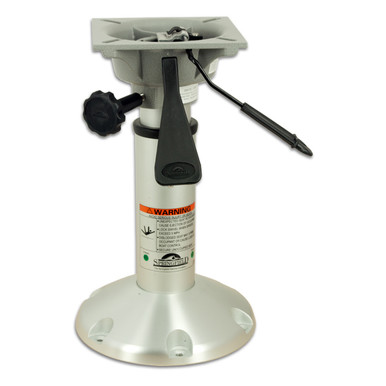
Looking for others who have done swap and what pedestal they used and what problems they have had with direct fitment.

Thanks!
 
I did the swap (2012 SX210).
Per my email confirmation, the below is what I purchased.

The replacement pedestal I had its bolt pattern off from the OEM pattern. That is, when situated straight forward, the pattern was rotated around 30-45 degrees. Which actually worked out as I was not successful in being able to recover all of the bolts as some of them snapped.

Have some form of epoxy to fill the old holes, a drill and die set to thread the new holes as well as new SS bolts. Also, maybe having WD-40, or some other lubricant handy might help with removing the old hardware.

As for the new pedestal, lots of adjustability and it even has a tad of a “shock” absorbing built in.

Mainstay Power Rise Pedestal with Seat Mount Slide 13.8" to 19.5"
1250151-LBD​
 
After what you went through with your engine troubles... drilling and taping is a walk in the park.

Glad to see you are enjoying your boat!
 
Just accept the fact that you will have to drill and tap. It's stupid easy, and most hardware stores will have a drill bit/tap kit for the size bolts you are buying. The kit may be under $10 and all you need is the tap T-handle to use it. You can use a drill, but it's important to go slow, and back up every couple turns to back out the shavings. Here is an example, of course you want the one sized for your new bolts.

https://www.amazon.com/IRWIN-HANSON...rwin+drill+and+tap&qid=1606751798&s=hi&sr=1-5

It's aluminum under the gelcote top, so it's the easiest thing to tap threads into other than plastic! Don't worry about filling the old holes, as they will be covered by the new base.

Best upgrade ever, as my stock seat can still slide forward. I love raising it all the way up, and sliding it up to the steering wheel, as it allows me to look over the windshield with a full backrest!!
 
What's the procedure for removing seats??
I unlocked it and swiveled and tried pulling up but I got nothing.
 
What's the procedure for removing seats??
I unlocked it and swiveled and tried pulling up but I got nothing.

If I recall, there are 4 screws that hold the seat to the base.
 
If I recall, there are 4 screws that hold the seat to the base.

So the seat unbolts from pedestal post/base(one piece). It looked like bottom of base assembly slides on post like office chairs.
I could always search SM but it looked self explanatory but theres always a trick.
Thanks
 
So the seat unbolts from pedestal post/base(one piece). It looked like bottom of base assembly slides on post like office chairs.
I could always search SM but it looked self explanatory but theres always a trick.
Thanks

Did this project some 18-20 months ago, so going off memory.I believe the seat attached to a base, which was attached to the pedestal.
The base mechanism is part of the pedestal and allows the seat to slide forward and aft.
Some of the bolts might be stubborn and require PB Blaster or the likes.
 
Did this project some 18-20 months ago, so going off memory.I believe the seat attached to a base, which was attached to the pedestal.
The base mechanism is part of the pedestal and allows the seat to slide forward and aft.
Some of the bolts might be stubborn and require PB Blaster or the likes.


I'll do the PB soak and maybe add heat from heat gun but I'll keep in mind drill/tap is a thing and its no surprise DIY
I read its a #3 phillips? Are they JIS type vs phillips . My neighbor is a Snap On dealer so if I need something I just have to ask.
 
As I recall on mine it was a Phillips. Totally agree with the 'go ahead and tap' comment. Mine was wicked easy. Cheap $10 tap and die set from Harbor Freight (that may not last another use--we will see) even came with the gauges. Match the gauge up to one of the bolts to find the size; confirm it in an existing hole. Look up on the internet the hole size to drill for that size tap. Put the seat where you want it. Mark. Drill. Tap.

As to the seat, mine were a little difficult to get out, but not anything that even required PB or anything.
 
Back
Top