- Messages
- 18,624
- Reaction score
- 21,004
- Points
- 1,102
- Location
- Raleigh, NC 27614
- Boat Make
- Yamaha
- Year
- 2016
- Boat Model
- 242X E-Series
- Boat Length
- 24
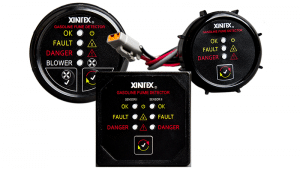
I just finished installing a FIREBOY XINTEX MB-1 Gasoline Fume Detector.
Details on why to do this and the Xintex MB-1:
Gasoline fumes in a bilge or engine compartment have the potential to be a serious risk at any time (starting, connecting batteries, etc). The MB-1 provides positive fume detection before trouble can develop. This simple,single channel detector is easily installed and will detect fumes from gasoline, butane, propane, and overcharging batteries. Standard 2" diameter display includes test button and alarm silence. Features a 10 amp relay to automatically start the bilge blower should fumes be detected. Once problem has cleared, blower(s) will automatically shut off. Includes 20' of lead.
Installation difficulty rating (from 1-5 with 5 being the hardest): 1.5. This is a pretty easy install
Tools Required:
-Wire cutters
-Wire crimp
-Drill and drill bit
-Hole Saw (2" or 2 1/16")
-Screw driver
-Fish tape or long stiff wire for pulling wire
-May need a small file for rough edges
Supplies Needed:
-Fume Detector
-16 gauge wire (ideally 4' of red, black and yellow, but one color would work).
-.5 amp fuse holder and fuse
-2 Female wire connectors, although it would have been easier if I'd had 2 of these-

Available at: http://www.wiringproducts.com/index1.html
http://www.wiringproducts.com/specialty-terminals
-2 "Y" connectors (unless you get the connector above)

-2 1/2"stainless steel screws (to mount the sensor)
-Zip ties (for keeping wiring tidy
How to Install:
1) Open the package and take out and familiarize yourself with the contents and read the directions. My directions are for your guidance. If the manual says something different, go with the manual!
1A) Turn off your battery switch(s)
2) Locate the fume detector and chose a mounting location in your bilge. For my 2005 SX230 I mounted it on the stern wall of the engine compartment high enough to not get splashed by any water that might be in the compartment.
3) Mark the locations to drill the 2 holes to mount the detector and drill the holes with a drill. Match the drill bit to the size of screw you have.
4) Remove the tape from the back of the sensor and stick in place over the holes, and then put the mounting screws in. (you can also just stick it in place and then drill and screw).
5) Plug the connecting wire into the sensor and route the wiring to the helm. I took the wiring across the top back of the engine compartment, along the side and through the hole into the underseat storage area. I then pushed a fish tape from the storage behind the helm to the stern, pulled out the cup holder at the back of the throttle section and reached in to pass the fish tape into the under seat storage area. I then pulled the wire up to the helm. I zip tied the wires along the way to keep them tidy.
6) Locate where you want the fume detector mounted. I chose to put it right in the dash for optimal visibility and audibility (is that a word?).

Once you have chosen your location, drill a hole to mount the display. The directions say a 2 1/16 inch hole, but I only had a 2" hole saw, and it fit in the hole perfectly. If you mount in the location I show, you will need to drill through the dash, and a small part of the behind the dash backing (the light grey stuff in the photo).
Wiring:
7) Reach in from behind and locate the blower rocker switch and squeeze if from top and bottom while pushing out. The switch will pop out. Pull off each of the red wires (note which is connected to the top and bottom), cut off the existing female connectors and if you have the nifty connectors show above, cut each of the two red wires and crimp on the new connectors. Attach a female connector to each of the yellow cables from the sensor and plug it onto the extra post. You will need to extend the wire from the sensor unless your mounting location is right next to the blower switch.
8) Run the black wire from the back of the sensor to a ground block if you have one, or follow the same directions as step 7 for the black wire.
9) Run the red wire from the back of the sensor to the inline fuse holder and then to your positive power source. I had both a ground block and blue sea switch to connect to, so this was a little easier for me. If you don't have this, then you can also tie the positive to the positive line from the battery in step 7. Just follow which red cable goes to the circuit breaker, and know that the other cable goes to the battery.
Test it:
10) Turn on your battery switch and confirm the display lights up the green light.
11) Press the test button and confirm the blower comes on.
12) Take a butane lighter and without striking it (but allowing butane to come out) put the lighter under the sensor. Confirm the blower comes on and the horn sounds.
13) Vacuum up the drilling mess and take a photo to share!
Here is a photo of where I install the fume detector on my 242X (I still haven't connected the blower control):

Details on why to do this and the Xintex MB-1:
Gasoline fumes in a bilge or engine compartment have the potential to be a serious risk at any time (starting, connecting batteries, etc). The MB-1 provides positive fume detection before trouble can develop. This simple,single channel detector is easily installed and will detect fumes from gasoline, butane, propane, and overcharging batteries. Standard 2" diameter display includes test button and alarm silence. Features a 10 amp relay to automatically start the bilge blower should fumes be detected. Once problem has cleared, blower(s) will automatically shut off. Includes 20' of lead.
Installation difficulty rating (from 1-5 with 5 being the hardest): 1.5. This is a pretty easy install
Tools Required:
-Wire cutters
-Wire crimp
-Drill and drill bit
-Hole Saw (2" or 2 1/16")
-Screw driver
-Fish tape or long stiff wire for pulling wire
-May need a small file for rough edges
Supplies Needed:
-Fume Detector
-16 gauge wire (ideally 4' of red, black and yellow, but one color would work).
-.5 amp fuse holder and fuse
-2 Female wire connectors, although it would have been easier if I'd had 2 of these-
Available at: http://www.wiringproducts.com/index1.html
http://www.wiringproducts.com/specialty-terminals
-2 "Y" connectors (unless you get the connector above)
-2 1/2"stainless steel screws (to mount the sensor)
-Zip ties (for keeping wiring tidy
How to Install:
1) Open the package and take out and familiarize yourself with the contents and read the directions. My directions are for your guidance. If the manual says something different, go with the manual!
1A) Turn off your battery switch(s)
2) Locate the fume detector and chose a mounting location in your bilge. For my 2005 SX230 I mounted it on the stern wall of the engine compartment high enough to not get splashed by any water that might be in the compartment.
3) Mark the locations to drill the 2 holes to mount the detector and drill the holes with a drill. Match the drill bit to the size of screw you have.
4) Remove the tape from the back of the sensor and stick in place over the holes, and then put the mounting screws in. (you can also just stick it in place and then drill and screw).
5) Plug the connecting wire into the sensor and route the wiring to the helm. I took the wiring across the top back of the engine compartment, along the side and through the hole into the underseat storage area. I then pushed a fish tape from the storage behind the helm to the stern, pulled out the cup holder at the back of the throttle section and reached in to pass the fish tape into the under seat storage area. I then pulled the wire up to the helm. I zip tied the wires along the way to keep them tidy.
6) Locate where you want the fume detector mounted. I chose to put it right in the dash for optimal visibility and audibility (is that a word?).
Once you have chosen your location, drill a hole to mount the display. The directions say a 2 1/16 inch hole, but I only had a 2" hole saw, and it fit in the hole perfectly. If you mount in the location I show, you will need to drill through the dash, and a small part of the behind the dash backing (the light grey stuff in the photo).
Wiring:
7) Reach in from behind and locate the blower rocker switch and squeeze if from top and bottom while pushing out. The switch will pop out. Pull off each of the red wires (note which is connected to the top and bottom), cut off the existing female connectors and if you have the nifty connectors show above, cut each of the two red wires and crimp on the new connectors. Attach a female connector to each of the yellow cables from the sensor and plug it onto the extra post. You will need to extend the wire from the sensor unless your mounting location is right next to the blower switch.
8) Run the black wire from the back of the sensor to a ground block if you have one, or follow the same directions as step 7 for the black wire.
9) Run the red wire from the back of the sensor to the inline fuse holder and then to your positive power source. I had both a ground block and blue sea switch to connect to, so this was a little easier for me. If you don't have this, then you can also tie the positive to the positive line from the battery in step 7. Just follow which red cable goes to the circuit breaker, and know that the other cable goes to the battery.
Test it:
10) Turn on your battery switch and confirm the display lights up the green light.
11) Press the test button and confirm the blower comes on.
12) Take a butane lighter and without striking it (but allowing butane to come out) put the lighter under the sensor. Confirm the blower comes on and the horn sounds.
13) Vacuum up the drilling mess and take a photo to share!
Here is a photo of where I install the fume detector on my 242X (I still haven't connected the blower control):
Last edited: