• Welcome to Jetboaters.net!

    We are delighted you have found your way to the best Jet Boaters Forum on the internet! Please consider Signing Up so that you can enjoy all the features and offers on the forum. We have members with boats from all the major manufacturers including Yamaha, Seadoo, Scarab and Chaparral. We don't email you SPAM, and the site is totally non-commercial. So what's to lose? IT IS FREE!

    Membership allows you to ask questions (no matter how mundane), meet up with other jet boaters, see full images (not just thumbnails), browse the member map and qualifies you for members only discounts offered by vendors who run specials for our members only! (It also gets rid of this banner!)

    free hit counter

Gas tank cover bolts seized

Gump1976

Jet Boat Addict
Messages
27
Reaction score
38
Points
112
Location
Jersey shore
Boat Make
Yamaha
Year
2019
Boat Model
242 Limited E-Series
Boat Length
24
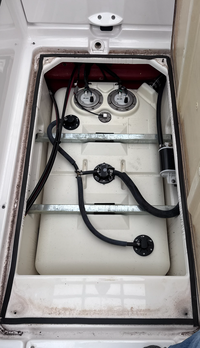
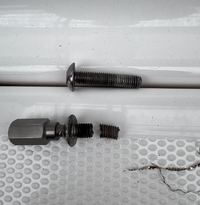
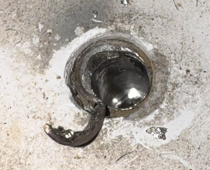
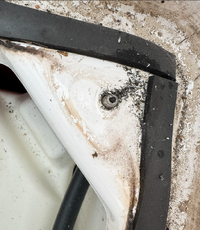
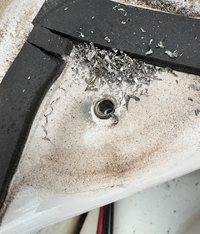
I just replaced my steering cables for the first time on my 2019 242. Will from JetBoatPilot posted helpful YouTube video where he completed this on a FSH model boat, which provided some good guidance. He even called out the problem I'm about to explain during his video. Basically the same process on the 242, but, in I have that large rectangle shape fuel tank cover that has to come up to complete the job. The forward two bolts were tight, but they came up clean. The two aft bolts however was another story. They would not budge. Ended up stripping the head off of both bolts. Tried vice grips and ended up just ripping more of the bolt off. I'm at the point now where I've started drilling out the remainder of the bolt, increasing bit size gradually. I don't want to damage the threads, so I'm at a standstill. I've never really dealt with a bolt situation like this.

I had the idea of securing the front two bolts as normal, but then for the rear, using a small amount of adhesive (4000) between the cover and the triangle shaped area where the problem bolt holes lie. I bought four new bolts for the cover, and I could cut the head off two of them and silicone the bolt head and washer in place on the cover to maintain the normal appearance visually.

Thoughts on this above solution, or I'm open to any alternatives anyone has for this scenario?

On the positive side, my steering is buttery smooth again.
 

Attachments

  • Screenshot 2026-05-31 181356.png
    Screenshot 2026-05-31 181356.png
    488.9 KB · Views: 10
  • Screenshot 2026-05-31 181315.png
    Screenshot 2026-05-31 181315.png
    580.9 KB · Views: 10
  • Screenshot 2026-05-31 180615.png
    Screenshot 2026-05-31 180615.png
    80.8 KB · Views: 9
  • Screenshot 2026-05-31 180533.png
    Screenshot 2026-05-31 180533.png
    924.2 KB · Views: 9
  • Screenshot 2026-05-31 180458.png
    Screenshot 2026-05-31 180458.png
    951.1 KB · Views: 10
I had the same issue with them snapping off and used vise grips to get the remainder. Don’t try to just unthread it out. Keep wiggling it back & forth along with spraying lube on the threads until you get it loosened up. Patience is the key.
 
I went through this hell recently myself as I have been going through the boat doing all maintenance items previous owners neglected.

I first did a small hole on the bolt and used one of those pencil style extractors and it snapped inside the bolt not allowing me to drill anymore as there was a piece of carbon steel in there now. Bought a bolt extractor kit off Amazon and was able to get one around the head of bolt and it twisted it off. This was a blessing as now I could get the lid off and there was a stub of bolt to then work with. Used another size extractor on the stub and it too twisted off. That was also a blessing as now it took the piece of the stuck carbon steel with it. I did not want to repeat breaking an extractor inside the bolt again so I was determined to drill through the entire bolt as I was figuring would need to break it out in pieces. It probably took at least 4 hrs on that stupid bolt and I ended up going up on the bit size after getting through to get it to break up. In the end, the new bolt threaded in and worked like a charm and I was happy.

I think the main problem with this bolt is that it was set into a glob of epoxy as there was a big blob right underneath the bolt so I assumed this was the issue but could not tell as the fiberglass was covering underneath. About half way into it, I was thinking like you and would just use some silicon to put a bolt head in place to give appearance but I wanted the lid to be tight so decided to go all the way.

I never have done an extraction like this before. Make sure to go slow and figure out what pressure to give as well as keep adding some oil to bolt in aid in bit cutting. Smaller bits will cut faster but with added pressure, they are prone to snap as well. Expect to ruin a few bits in the process. I think I broke 3 and wore down heads of another 3 in the process.

Highly recommend replacing the foam seal while at it. Mine was worn out and was actually acting like a sponge and holding moisture where I had a bunch of tiny bugs were living in it. I also addressed the underside of my lid as I had several areas where fiberglass was cracked that moisture could get in as well as areas where the wood was completely exposed to soak water in. After letting it dry, I first used wood conditioner on areas where wood was exposed and beginning to rot. It gets soaked into the wood and then works like epoxy and hardens the wood. After that, I used regular epoxy to then seal the cracks and coat the areas of exposed wood. Also also gave all the bolts a coating of corrosion spray to avoid having them seize again.

My tank also had all these rectangular foam blocks that seemed like spacers scattered about in the compartment. Some were under the tank and can see it being useful there. Others were just laying around. I was not sure where they went but I know my hatch seemed to give some when walking on it so I siliconed a few to the steel crossmembers to give it some more support.
 
Best stuff EVER for rusted bolts.
Follow the instructions on the can and let it do it's magic.
 
Back
Top